The enemy of a carbide rotor is not just wear, but uneven and unpredictable wear. The goal of all maintenance is to promote even wear across all rotor wings and carbide tips, allowing you to simply rotate the tips or wings as a set when they are uniformly worn, rather than replacing single, prematurely failed parts.
1. Daily/Pre-Startup Visual Inspections (The 5-Minute Check)
This is the most critical DIY habit. Never start the crusher without a quick look.
- Check for Buildup: Look for material packed in the rotor, especially between the rotor wings and inside the feed tube. Use a flashlight. Packed material unbalances the rotor, causing vibration and uneven wear. Remove it with a brush or pry bar.
- Look for Loose Parts: Visually check for any obvious cracks on the rotor wings or missing carbide tips. A missing tip will cause catastrophic and rapid wear to the soft iron rotor wing.
- Inspect the Anvil/Backup Shoes: Check for deep wear or damage. A worn anvil will throw material back into the rotor at the wrong angle, accelerating rotor wear.
2. The Golden Rule: Monitor Crusher Parameters
Your VSI’s performance data is a direct window into rotor health. Keep a simple log.
- Rotor RPM: Running too fast for the material increases wear exponentially. Run at the minimum effective speed for your desired product size.
- Crusher Feed Rate: Ensure a consistent, choked feed. A “starved” or “trickle” feed causes rock-on-rock contact inside the rotor instead of a rock-lined “bed” that protects it. This is a major cause of premature wear.
- Feed Size Distribution: A mix of fines and larger rock is ideal. Too many oversized rocks cause impact damage. An excess of fines can sometimes accelerate abrasive wear if they don’t form a proper rock shelf.
3. Rotor Tip Rotation & Inspection (The Key to Longevity)
This is the most impactful DIY task you can perform. The frequency depends on your hours and material abrasiveness.
- When to Rotate: Don’t wait for tips to be completely destroyed. Establish a schedule based on your wear rates (e.g., every 50-100 hours). Inspect them halfway through a expected tip life to check your schedule.
- The Process:
- Lock Out/Tag Out the crusher completely.
- Mark each tip position with a paint pen or number them.
- Remove the tips. Soaking the bolts in a penetrating oil beforehand makes this much easier.
- Inspect the Wear Pattern:
- Even Wear: Perfect. This is the goal.
- Uneven Wear (e.g., one side more worn): This indicates a feed issue or anvil alignment problem. Note it for correction.
- “Dished” or Scooped Wear: Classic sign of highly abrasive material. Rotate tips more frequently.
- Broken or Chipped Tips: Indicates tramp metal, uncrushables, or impact from oversized feed.
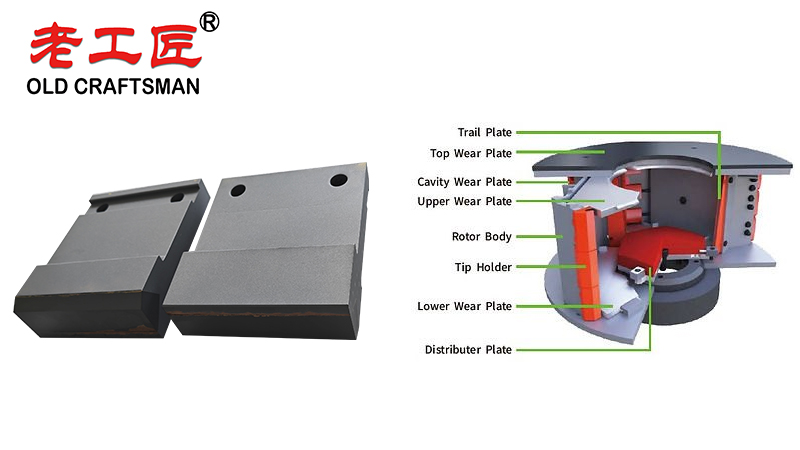
- Rotate the Tips: Move the tips from the outer positions to the inner positions, and vice-versa. The outer tips wear fastest. A common pattern is to move Tip 1 -> Position 3, Tip 2 -> Position 4, Tip 3 -> Position 1, Tip 4 -> Position 2, etc. Refer to your manufacturer’s manual for the best pattern.
- Replace in Sets: When it’s time for new tips, replace all tips on a rotor wing at the same time. Never mix new and old tips on the same wing, as it creates an imbalance and uneven loading.
4. Optimizing Feed Material & System Setup
You can’t always control the material, but you can control how it’s presented to the rotor.
- Center the Feed: Ensure the feed is centered directly into the rotor. An off-center feed will wear one side of the rotor dramatically faster. Use the inspection door to check the rock pattern on the rotor shelf.
- Manage Moisture & Fines: Sticky, clay-rich material can build up in the rotor and feed tube. Consider a grizzly or screen to remove excess fines if buildup is a constant problem.
- Tramp Iron is the #1 Enemy: A single piece of steel or manganese can shatter multiple carbide tips in an instant.
- Use Your Magnet! Ensure the suspended magnet over your feed conveyor is working correctly and cleaned regularly.
- Metal Detectors: If you have one, ensure it is calibrated and functional.
5. Vibration Monitoring
Your ears and the crusher’s gauges are your best tools.
- Listen for Changes: A change in the sound of the crusher new rattles, grinding, or a higher pitched “howl” can indicate a broken tip or significant imbalance.
- Watch the Ammeter: A sudden drop in amperage can indicate a starved feed. A sudden spike can indicate a jam or heavy load from packed material.
- Feel for Vibration: Excessive vibration is a clear sign of rotor imbalance, often caused by a missing tip, packed material, or severe uneven wear. Stop immediately and investigate.
DIY Maintenance Checklist & Schedule
| Frequency | Task | Key Point |
|---|---|---|
| Daily (Pre-Start) | Visual inspection for buildup & damage. | Look for packed material and loose/missing parts. |
| Every Shift | Monitor crusher parameters (RPM, feed rate). | Ensure consistent, choked feed at correct speed. |
| Weekly | Check anvil/backup shoe wear and alignment. | Worn anvils destroy rotors. Adjust or replace as needed. |
| Every 50-150 hrs | Rotate carbide tips & inspect wear patterns. | The single most important task for even wear. |
| As Needed | Clean out feed tube and rotor thoroughly. | Prevent imbalance from material buildup. |
| Constant | Listen for unusual noise and monitor vibration. | Your first warning of a serious problem. |
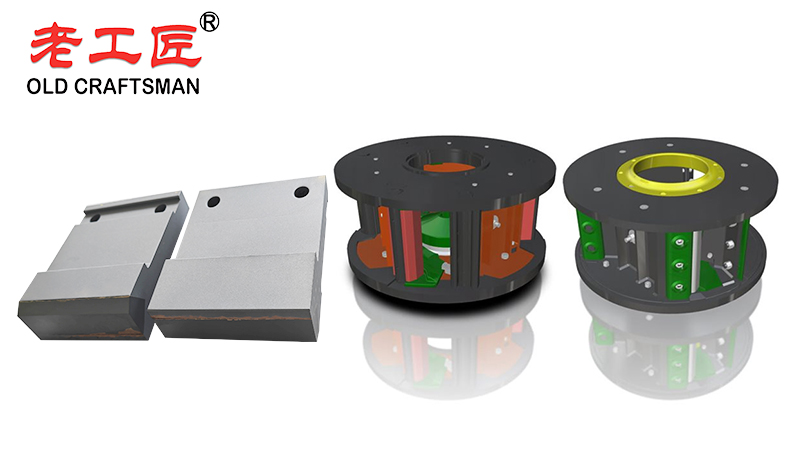
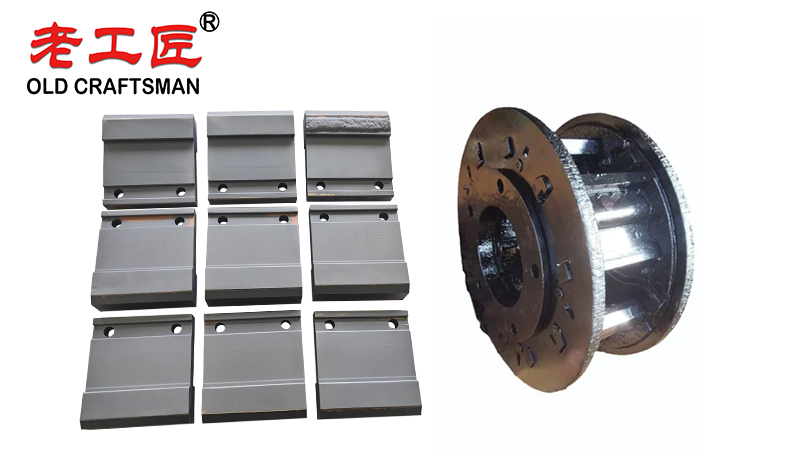
In the highly demanding environment of vertical shaft impact (VSI) crushers, rotor tips are critical wear parts that directly affect crushing efficiency and operating costs. To achieve maximum durability and cost effective performance, many manufacturers now use silicon carbide or carbide inserted cemented carbides for these cutting tools, as these materials rank extremely high on the Mohs scale of hardness among synthetic abrasives. The combination of wear resistant rotor tips with high quality stainless steel backing plates and precisely designed feeding tubes (whether center feeding or cascade type) ensures cleaner cut edges on the crushed product and significantly extends service life. This advanced wear solution not only reduces downtime but also delivers superior long term value compared to traditional brake rotor or brake pad materials adapted for crushing applications, making it the preferred choice for fixed-wing aircraft recycling, mining, and aggregate industries worldwide.
What to Avoid at All Costs
- Running with a Starved Feed: This is the fastest way to kill a rotor.
- Ignoring Vibration: Vibration begets more vibration and damage. Stop and fix it.
- Allowing Tramp Metal: One mistake is very expensive.
- Mixing Old and New Tips on One Wing: Creates imbalance and point loading.
- Using Impact Wrenets Incorrectly: When installing new tips, follow the torque specification. Overtightening can strip threads or crack the carbide. Use a torque wrench.
By adopting these simple but disciplined DIY maintenance habits, you will see a dramatic increase in your VSI carbide rotor life, leading to lower operating costs, more consistent production, and greater overall profitability.
“Zhuzhou Old Craftsman Precision Alloy Co., Ltd. could make tungsten carbide wear parts and make your equipment use life is tens of times longer than before! We specialize in providing customized carbide wear products solutions to meet the demanding requirements of industries such as aerospace, automotive, mining, and precision machining.”
Belt scraper Brazing brazingprocess CARBDIE HAMMER carbide Carbide belt scraper carbidebrazing carbide hammer Crusher CRUSHER HAMMER Informational Internal stress metal mining Refractory Brick Mold Secondary belt cleaner scraper stresses VSI crusher wear plates welding